基于Ubuntu下的WRF,FLEXPAERT运行以及FLEXINVERT的反演 *WRF编译*
2025.4.23
Linux配置:Ubuntu 24.04.2 LTS
使用gfortran编译
总体思路:安装WRF相关依赖并设置环境变量 —> 编译运行WRF
一、环境依赖安装:
1.我们需要:hdf5-1.12.2、zlib-1.3.1、libpng-1.6.40、jasper-4.2.5、netcdf-c-4.9.2、netcdf-fortran-4.6.1、MPI这几个依赖。
- 由于各个版本兼容问题,建议netcdf-c、netcdf-fortran、hdf5、jasper安装第三方库,如果直接通过apt直接安装系统自带的环境依赖部分会因为版本问题导致不兼容。
- 环境依赖的安装请严谨的按照步骤来否则会导致后面各种莫名其妙的报错。
netcdf-c下载地址:https://github.com/Unidata/netcdf-c
netcdf-fortran下载地址:https://github.com/Unidata/netcdf-fortran
Jasper下载地址:https://github.com/jasper-software/jasper/releases
Hdf5下载(通过终端输入):
wget https://support.hdfgroup.org/ftp/HDF5/releases/hdf5-1.12.2/src/hdf5-1.12.2.tar.gz
tar -xzvf hdf5-1.12.2.tar.gz
编译第三方依赖
现在你的目录中已经有各个库的安装包了,现在需要将其编译并写入环境变量。(注意netcdf要先编译netcdf-c才能编译netcdf-fortran)
以netcdf为例子:
1
2
3
4
5
6
7
8
9
cd netcdf-c-4.9.2 #cd到库的目录
同样的安装netcdf-fortran
1
2
3
4
5
6
7
8
9
cd netcdf-fortran-4.6.1 #cd到库的目录
Japser的安装:
注意jasper的安装需要cmake,没有安装这个的需要安装一下。
1
2
3
4
5
6
7
8
9
mkdir jasper-4.2.5-build #jasper的编译比较特殊,需要单独在文件外建一个文件夹编译
其余通过apt安装无需手动编译。
安装GNU Fortran 编译器。
1
2
3
4
5
sudo apt update
安装WRF
官网WRF模型的download list已经停止更新,需要到GitHub上找到最新版本,我这里选择的是4.7.0。https://github.com/wrf-model/WRF/releases
注意如果想在windows下载然后在传到linux的同学要将压缩包传入并在linux上解压,如果在windows解压会出现链接错误,会导致之后编译报错。
添加环境变量
终端输入vi ~/.bashrc编辑全局变量文件(注意每一次安装库或编译文件的时候都要记住source ~./bashrc 一下以免出现路径解析问题)
在最下面加入
1
2
3
4
5
6
7
8
9
10
11
12
13
14
15
16
17
18
19
20
21
22
23
24
25
26
27
28
29
30
31
32
33
34
35
36
37
38
39
40
41
42
43
44
45
46
47
48
49
50
51
52
53
54
55
56
57
58
59
60
61
62
63
64
65
66
67
68
69
70
71
72
73
74
75
76
77
78
79
80
81
82
83
84
85
86
87
88
89
90
91
92
93
94
95
96
97
98
99
100
101
102
103
104
105
106
107
108
109
110
111
112
113
114
115
116
117
118
119
120
121
122
123
124
125
export EM_CORE=1
然后通过source ~/.bashrc就可以生效环境变量(每涉及到模型编译或者三方库安装都要记得生效环境变量。)
编译WRF
介于已经成功安装依赖,接下来只需要cd到WRF目录
cd WRFV4.7.0
./configure #选择34个编译器,然后第2个select直接回车
./compile em_real >& log.compile & #运行会导入到log.compile文件
tail -f log.compile #开始编译
跑个十几分钟最后出现:
1
2
3
4
5
6
7
8
9
---> Executables successfully built <---
表示安装成功,成功生成4个exe文件。
*WPS编译*
安装WPS4.6
安装地址:https://github.com/wrf-model/WPS/releases
tar zxfv WPS-V4.6.tar.gz #解压
下载完成后解压,记得将其放到和WRF同一个文件下。
编译WPS
根据前面已经成功安装jasper、zlib、libpng等库,我们cd到根目录中直接开始编译:
1
2
3
./configure #选择第3个编译器
ungrib.exe无法生成问题
如果都按照前面来的话不出所料日志中会显示:“dec_jpeg2000.c:(.text+0x1f):对‘jpc_decode’未定义的引用”的报错,这是由于jasper最新版不兼容的问题,我们需要到dec_jpeg2000.c文件中修改一个函数。
1 vim ~/桌面/WPS-4.6/ungrib/src/ngl/g2/dec_jpeg2000.c
然后将
1 image=jpc_decode(jpcstream,opts); #大概83行
改为
1 image=jas_image_decode(jpcstream,4,opts);
然后重新编译dec_jpeg2000.c文件:
1
2
3
4
5
6
7
8
9
cd ~/桌面/WPS-4.6/ungrib/src/ngl/g2 #cd到WPS的g2文件
最后成功生成ungrib.exe,geogrid.exe, metgrid.exe表示成功。
*FLEXPART编译*
官方文档:https://flexpart.img.univie.ac.at/docs/building.html#compiling
下载eccodes-2.41.0并解压(github搜索eccodes)
1
2
3
4
5
6
7
cd eccodes-2.41.0-Source
注意没装cmake的同学要装cmake
设置环境变量:
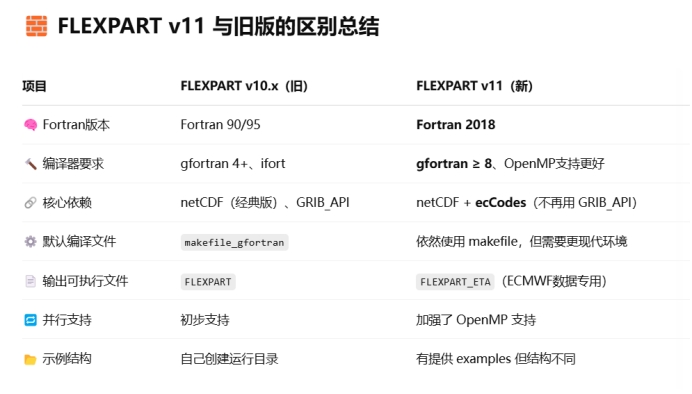
在ai生成的对比中我们可以看到和旧版flexpart还是有些不一样的,所以我们还是根据官方文档配置。
由于我们是gfortran编译的,所以:
1 2 3 $ cd src/$ make -j -f makefile_gfortran
最终在src中生成一个FLEXPART_ETA文件表示成功
*Flexpart_extract编译*
https://flexpart.img.univie.ac.at/flexextract/Installation/local.html#ref-local-mode
安装需要的依赖:
1 2 3 4 5 6 7 8 9 10 11 12 13 apt-get install python3 (usually already available on GNU/Linux systems)
注意如果说权限不足需要在apt-get前面加上sudo
1 2 3 4 5 apt-get install pip
(注意文档中“测试本地环境”的python脚本需要api)
最后cd到根目录:
./setup_local.sh
如果在Source/Fortran下生成calc_etadot文件表示成功
可以测试一下calc_etadot文件,测试步骤:
cd Testing/Installation/Calc_etadot
../../../Source/Fortran/calc_etadot
如果返回类似这样:
STATISTICS: 98842.4598 98709.7359 5120.5385
STOP SUCCESSFULLY FINISHED calc_etadot: CONGRATULATIONS
表示文件没有问题。
*Flexinvert编译*
下载源代码https://git.nilu.no/flexpart/flexinvertplus
1 2 3 cd flexinvertplus/source
将makefile中将前面3行修改成:
1 2 3 4 5 F90 = gfortran
然后在当前的source文件下
make
最后返回类似这样:
表示编译成功。
Prep_flexpart
*Flexpart-wrf编译*
参考这篇文章https://blog.csdn.net/Tsumugi_Kotobuki/article/details/144706249
在makefile.mom中作修改:NETCDF=/usr/local/netcdf
在GNU_FFLAGS的最后面加上:-fallow-argument-mismatch -fallow-invalid-boz
Flexpartv11运行
新建项目文件
一般运行需要新建一个案例文件夹,然后复制flexpart中的文件到案例文件夹中来运行。
需要复制的有:options,FLEXPART_ETA,
配置COMMAND,RELEASE,AVAILABLE,删除SATELLITE
将oh_fields文件移到FLEXPART_ETA同级目录
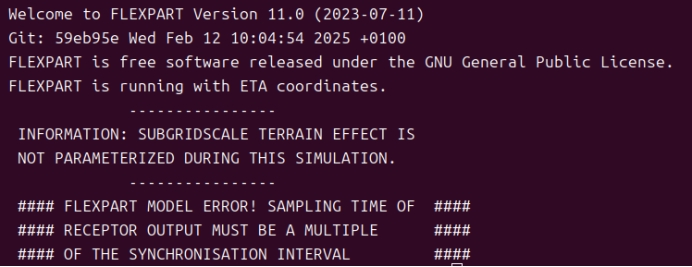
运行FLEXPART_ETA
可视化nc数据
报错小记
*①出现* *ERROR STOP READWIND GFS: LOWER LEFT LONGITUDE NOT CONSISTENT*
这是由于motherdomin的经度区域和风场的经度区域没有对上。去COMMAND中修改NXSHIFT的值为0。
出现ERROR: POHCCONST,POHDCONST, and POHNCONST in SPECIES file are deprecated.这是由于新版本中SPECIES的内容不对标,需要将旧版本的内容复制到新版本里。
出现没有输入卫星数据却出现readreceptors satellite:…….等内容,而且最后文件正常生成,这里怀疑也是新版本的问题,如果不需要卫星数据直接删除options中的SATELLITE即可
*②出现下面问题*
由于时间参数不一致:
&COMMAND
! … (其他参数保持不变) …
LRECOUTSTEP= 3600,
LRECOUTAVER= 3600,
LRECOUTSAMPLE= 900, ! <— 修改这里
LSYNCTIME= 900,
! … (其他参数保持不变) …
/
*③出现下面问题*
重新下载气象文件解决。
*④出现Program received signal SIGSEGV: Segmentation fault - invalid memory reference.*
经过观察发现是OH数据的垂直高度和气象数据的垂直高度不符合导致的数组越界
Vertical levels in NCEP data: 31 31
然而:
1 2 3 4 5 6 7 8 9 10 11 12 13 14 15 16 17 18 19 netcdf OH_09 {dimensions :360 ;180 ;40 ;time = 1 ;units = "degree_east" ;units = "degree_north" ;units = "m" ;time (time ) ;time :units = "days since 2000-01-01" ;float OH(time , lev, lat, lon) ;units = "molecules/cm3" ;1. f ;
可以看到OH高度有40但是NCEP数据只有31层。
解决:经过数值排查,我们可以将OH的高度插值插到31层。
其中我们需要用到两个python脚本请先复制这两个脚本。
read_bin.py:
1 2 3 4 5 6 7 8 9 10 11 12 13 14 15 16 17 18 19 20 21 22 23 24 25 26 27 28 29 30 31 32 33 34 35 36 37 38 39 40 41 42 43 44 45 46 47 48 49 50 51 52 53 54 55 56 57 58 59 60 61 62 63 64 65 66 67 68 69 70 71 72 73 74 75 76 77 78 79 80 81 82 83 84 85 86 87 88 89 90 91 92 93 94 95 96 97 98 99 100 101 102 103 104 105 106 107 108 109 import structimport numpy as np"/home/dell/桌面/runs/damingshan/output/heightlevels.bin" 'f' 4 384 // bytes_per_float '<' try :with open (filepath, "rb" ) as f:for _ in range (num_total_values):if not packed_value or len (packed_value) < bytes_per_float:break 0 ]3 print (f"Total values: {num_total_values} , Number of groups (3 values per group): {num_groups} " )1 ::3 ]print (f"\nExtracted {len (extracted_interfaces_offset1)} values by taking every 3rd element starting from index 1:" )print (extracted_interfaces_offset1)if len (extracted_interfaces_offset1) == 32 :print ("\nPotential NCEP Model Layer Interface Heights (m):" )print (target_ncep_interface_heights_m)True if not (np.isclose(target_ncep_interface_heights_m[0 ], 0.0 ) or target_ncep_interface_heights_m[0 ] < 1.0 ): print (f"Warning: First interface height is {target_ncep_interface_heights_m[0 ]} , expected close to 0." )if not np.all (diffs > -1e-6 ):print ("Warning: Interface heights are not strictly monotonically increasing." )print ("Differences between consecutive interface heights:" )print (diffs)False if is_monotonic:print ("\nInterface heights appear to be valid (starts near 0 and mostly monotonically increasing)." )31 )for i in range (31 ):1 ]) / 2 print ("\nCalculated 31 NCEP model layer center heights (m):" )print (target_ncep_center_heights_m)if np.all (np.diff(target_ncep_center_heights_m) > 0 ):print ("\nCenter heights are monotonically increasing. Ready for interpolation!" )else :print ("\nError: Calculated center heights are NOT monotonically increasing after deriving from interfaces. Check the logic." )else :print ("\nInterface heights do not meet validation criteria. Manual check needed." )else :print (f"\nWarning: Expected 32 interface heights, but extracted {len (extracted_interfaces_offset1)} using offset 1. Try other offsets or manual inspection." )except FileNotFoundError:print (f"Error: File not found at {filepath} " )except Exception as e:print (f"An error occurred: {e} " )
chazhi.py
1 2 3 4 5 6 7 8 9 10 11 12 13 14 15 16 17 18 19 20 21 22 23 24 25 26 27 28 29 30 31 32 33 34 35 36 37 38 39 40 41 42 43 44 45 46 47 48 49 50 51 52 53 54 55 56 57 58 59 60 61 62 63 64 65 66 67 68 69 70 71 72 73 74 75 76 77 78 79 80 81 82 83 84 85 86 87 88 89 90 91 92 93 94 95 96 97 98 99 100 101 102 103 104 105 106 107 108 109 110 111 112 113 114 115 116 117 118 119 120 121 122 123 124 125 126 127 128 129 130 131 132 133 134 135 136 137 138 139 140 141 142 143 144 145 146 147 148 149 150 151 152 153 154 155 156 157 158 159 160 161 162 163 164 165 166 167 168 169 170 171 172 173 174 175 176 177 178 179 180 181 182 183 184 185 186 187 188 189 190 191 192 193 194 195 196 197 198 199 200 201 202 203 204 205 import xarray as xrimport numpy as npfrom scipy.interpolate import interp1dimport os"/home/dell/桌面/runs/damingshan/oh_fields/OH_08.nc" "./oh/OH_08.nc" 8.40779079e-45 , 9.71721268e+01 , 2.93582161e+02 , 4.95098663e+02 ,7.03080627e+02 , 1.03010489e+03 , 1.48572131e+03 , 1.96812732e+03 ,2.47913672e+03 , 3.02077808e+03 , 3.59680859e+03 , 4.21222021e+03 ,4.87124316e+03 , 5.57997314e+03 , 6.34792578e+03 , 7.18677588e+03 ,8.11339307e+03 , 9.15671973e+03 , 1.03706899e+04 , 1.18628960e+04 ,1.38443198e+04 , 1.59727891e+04 , 1.78656680e+04 , 2.01546514e+04 ,2.26340127e+04 , 2.56962832e+04 , 2.87180166e+04 , 3.08285283e+04 ,3.35458379e+04 , 3.66107129e+04 , 4.05469961e+04 if len (target_ncep_center_heights_m) != 31 :raise ValueError(f"Error: target_ncep_center_heights_m should have 31 values, but has {len (target_ncep_center_heights_m)} ." )def interpolate_oh_file (input_filepath, output_filepath, target_heights ):print (f"Processing file: {input_filepath} " )try :except FileNotFoundError:print (f"Error: Input file not found: {input_filepath} " )return 'OH' ]'lev' ].dataif len (source_heights_orig) != 40 :print (f"Warning: Expected 40 source levels in {input_filepath} , but found {len (source_heights_orig)} . Adjust script if necessary." )len (target_heights)0 ], num_target_levels, oh_data_orig.shape[2 ], oh_data_orig.shape[3 ]),'missing_value' , None )'_FillValue' , None )if missing_value_attr is not None :elif fill_value_attr is not None :print (f" Original OH data shape: {oh_data_orig.shape} " )print (f" Original source heights ({len (source_heights_orig)} levels): {source_heights_orig[:5 ]} ...{source_heights_orig[-5 :]} " )print (f" Target NCEP heights ({num_target_levels} levels): {target_heights[:5 ]} ...{target_heights[-5 :]} " )print (f" Using original fill/missing value: {actual_fill_value_orig} " )for t_idx in range (oh_data_orig.shape[0 ]):for lat_idx in range (oh_data_orig.shape[2 ]):for lon_idx in range (oh_data_orig.shape[3 ]):0 ]1 ]'linear' ,False , fill_value=(fill_below, fill_above))print (" Interpolation completed." )'lev' ,),'units' : 'm' , 'long_name' : 'NCEP model layer center height' , 'positive' : 'up' } 'time' : ds_orig['time' ],'lev' : new_lev_coord,'lat' : ds_orig['lat' ],'lon' : ds_orig['lon' ]'time' , 'lev' , 'lat' , 'lon' ),'OH' ,1.e20 if '_FillValue' in oh_interp_da.attrs:'_FillValue' ]del oh_interp_da.attrs['_FillValue' ]if final_fill_value_for_encoding == -1.e20 or np.isnan(final_fill_value_for_encoding): 'missing_value' ]del oh_interp_da.attrs['missing_value' ]'comment' ] = (ds_interp.attrs.get('comment' , '' ) +'; Vertically interpolated to NCEP 31 model levels.' ).strip()try :if output_dir and not os.path.exists(output_dir):if 'OH' in ds_interp:'OH' ] = {'_FillValue' : final_fill_value_for_encoding}format ="NETCDF4_CLASSIC" , encoding=encoding)print (f" Interpolated OH data saved to: {output_filepath} " )except Exception as e:print (f"Error saving NetCDF file: {e} " )finally :if __name__ == "__main__" :if not isinstance (target_ncep_center_heights_m, np.ndarray) or len (target_ncep_center_heights_m) != 31 :print ("Error: 'target_ncep_center_heights_m' is not correctly defined as a NumPy array of 31 values." )print ("Please check the 'target_ncep_center_heights_m' variable at the top of the script." )else :
然后执行read_bin.py选择第三个数组复制到chazhi.py中我所标注的位置,然后再执行chazhi.py,然后将插值过后的nc文件替换原先flexpart中oh_fields中的数据。
执行的中如果有这些内容然后还是报错的话,多尝试几次就可以了。
*Flexinvert运行配置*
Flexinvert有prep_flexpart,prep_satellite,prep_fluex,prep_regions四个文件可以编译。官方配置文档:
https://flexinvert.nilu.no/documentation/
Prep_flexpart配置
1.编辑makefile中的前三行的LIBPATH1和INCPATH1,将其指向netcdf库的正确位置。
1
2
3
4
5
F90 = gfortraninclude /
然后make编译,会出现一个可执行文件。
处理站点数据
首先我们需要将站点数据文件按照basic模板格式处理站点数据:
数据格式类似于下面:
YYYY MM DD HH MI SS CONC ERR LON LAT ALT
2020 08 31 16 04 57 1959.4422 38.1888 118.5000 30.0000 100.0
2020 08 31 17 04 57 1996.2602 38.1252 118.5000 30.0000 100.0
然后我们将这个文件放到input/obs中(没有文件夹就创建)。
然后在input文件中创建reclist.txt文件,将站点名称输入该文件中。
3.修改SETTINGS文件
将其中该修改的路径修改,修改过程中注意:
file_availnest:是嵌套网格,如果气象文件中没有这个不需要填写,不然会报错。
obsformat:填写basic
COMMAND和OUTGRID都根据原先flexpart运行案例修改。
4.运行job_prep_flexpart.sh
运行./job_prep_flexpart.sh。
如果出现类似:
Reading file: /flexinvert/input/obs/DMS.txt
表示读取成功
5.运行run_flexpart.sh
修改run_flexpart.sh文件中的路径:
SLURM=0
EXENAME=FLEXPART_ETA
DIRFLEX=案例路径
DIROPTIONS=案例options路径
STNLIST=(站点名称)
MONLIST=(模拟月份)
YEAR=模拟年份
其中由于flexpart案例的路径问题可能还需要作一些修改:
1 2 3 4 5 6 7 8 9 10 11 12 13 14 15 16 17 18 19 20 21 22 23 24 25 26 27 28 29 30 31 cd ${DIRFLEX} if [ ! `ls ${DIRFLEX} /${EXENAME} ` ]; then ${COMMAND} if [ ! `ls ${DIRFLEX} /${EXENAME} ` ]; then echo "cannot create exec: " ${DIRFLEX} src/${EXENAME} exit -1fi fi chmod u+x ${EXENAME} cd ${DIROPTIONS} ${STN} /${YEAR} ${MON} cp ${DIRFLEX} /${EXENAME} job_${STN} _${MON} rm -f flex.logecho "submitting job for: " ${STN} " " ${MON}
修改完之后就可以运行./run_flexpart.sh
运行日志需要在站点目录下的flex.log文件中查看。
如果日志最后显示:
CONGRATULATIONS: YOU HAVE SUCCESSFULLY COMPLETED A FLEXPART MODEL RUN!
表示运行成功
7.报错记录:
报错信息:
FLEXPART MODEL ERROR
Release starts before simulation begins or ends
After simulation stops.
Make files COMMAND and RELEASES consistent
经过排查发现1.站点COMMAND中IBADATE时间与SETTINGS中不一致2.RELEASES中列出的排放之间严重超过模拟时间范围。
解决:1.将COMMAND中时间修改成SETTINGS中一致的时间
2.将RELEASES中超出时间的部分删除
*准备prep_regions*
首先编译运行该文件:make
然后编辑SETTINGS_regions相关参数
编辑job_prep_regions.sh文件前个路径参数
Settings_files指向settings中的ghg_files
Settings_config指向settings中的ghg_config
Settings_region指向prep_regions中的SETTINGS_regions
4.运行./job_prep_regions.sh
注意:如果运行之后没有报错信息但是cnt=0,可能是SETTINGS_ghg_files文件中的.txt需要改成txt,不然根据read_obs.f90中判断逻辑会直接跳过站点数据读取。还有在SETTINGS_ghg_files中mask file也是需要设置的,可以在案例文件中找到regions_ghg.nc
*开始反演,运行job_flexinvert*
1.准备数据
下载我们需要的通量数据,边界数据,elev数据等,将各项数据放入input中方便文件导入。注意各个文件不是都是下载完就可以用的,部分需要根据模型自行调整数据,模型才能运行。
2.修改配置文件
修改settings中的SETTINGS_ghg_config和SETTINGS_ghg_files。
在SETTINGS_ghg_files设置各个数据的路径以便模型找到数据。注意SETTINGS_ghg_files中的path_flexpart的路径其实是:(你所加的路径)/(工作站缩写)/(年份)/(输出数据)。
所以我们可以手动将文件复制:在input文件下创建DMS/202009/,然后将你prep_flexpart跑出来的所有数据都复制到年份文件中,然后再在SETTINGS_ghg_config的path_flexpart设置路径为…/input/即可。
提取不同数据的时候主要要改相应的变量名。
逐一更改SETTINGS_ghg_config和SETTINGS_ghg_files中相应的值
修改站点格式
由于运行反演的时候需要的站点格式有所不同,因此我需要重新转换一下格式。运行下面python程序:
1 2 3 4 5 6 7 8 9 10 11 12 13 14 15 16 17 18 19 20 21 22 23 24 25 26 27 28 29 30 31 32 33 34 35 36 37 38 39 40 41 42 43 44 45 46 47 48 49 50 51 52 53 54 55 56 57 58 59 60 61 62 63 64 65 66 67 68 69 70 71 72 73 74 75 76 77 78 79 80 81 82 83 84 85 86 87 88 89 90 91 92 93 94 95 96 97 98 99 100 101 102 103 104 105 106 107 108 109 110 111 112 113 114 115 116 117 118 119 120 121 122 123 124 125 126 127 128 129 130 131 132 133 134 135 136 137 138 139 140 141 142 143 144 145 146 147 148 149 150 151 152 153 154 155 156 157 158 159 160 161 162 163 164 165 166 167 168 169 170 171 172 173 174 175 from astropy.time import Timeimport astropy.units as uimport osdef convert_obs_data_flexinvert (input_filepath, output_filepath ):try :if not site_name: raise ValueError("Could not determine site name from input filename." )except Exception as e:print (f"Error: Could not extract site name from input_filepath '{input_filepath} '. {e} " )print ("Please ensure input_filepath is valid and contains the site name (e.g., '.../DMS.txt')." )return 0.0 1 print (f"Input file: {input_filepath} " )print (f"Output file: {output_filepath} " )print (f"Extracted site name: {site_name} " )try :with open (input_filepath, 'r' ) as infile, open (output_filepath, 'w' ) as outfile:"HEADER_LINE_FOR_FLEXINVERT_TO_SKIP_BY_PYTHON_SCRIPT\n" )False for line_number, line in enumerate (infile):if not line: continue if not header_skipped_input:True print (f"Skipping input file's own header: {line} " )continue if len (parts) < 11 :print (f"Warning: Skipping malformed line {line_number + 1 } in input file: {line} " )continue try :int (parts[0 ])int (parts[1 ])int (parts[2 ])int (parts[3 ])int (parts[4 ])int (parts[5 ])float (parts[6 ])float (parts[7 ])f"{year:04d} {month:02d} {day:02d} " f"{hour:02d} {minute:02d} {second:02d} " f"{year} -{month:02d} -{day:02d} T{hour:02d} :{minute:02d} :{second:02d} " , format ='isot' , scale='utc' )f"{site_name:<3s} " f"{yyyymmdd_str:8s} " f"{hhmmss_str:6s} " f"{julian_date:14.6 f} " f"{avetime:10.6 f} " f"{conc:10.4 f} " f"{err:10.4 f} " f"{num_flag:4d} " "\n" )except ValueError as e:print (f"Warning: Skipping line {line_number + 1 } in input file due to data conversion error ({e} ): {line} " )except Exception as e:print (f"An unexpected error occurred on line {line_number + 1 } in input file ({e} ): {line} " )print (f"Conversion complete. Output written to {output_filepath} " )except FileNotFoundError:print (f"Error: Input file not found at '{input_filepath} '. Please check the path." )except Exception as e:print (f"An error occurred during file processing: {e} " )"站点文件位置/flexinvert/input/obs/DMS.txt" "输出文件位置/flexinvert/input/DMS.txt" if __name__ == "__main__" :if os.path.exists(flexinvert_input_obs_file_path):".bak_before_python_conversion" print (f"Backing up existing '{flexinvert_input_obs_file_path} ' to '{backup_path} '" )try :except OSError as e:print (f"Warning: Could not create backup. {e} . Output file might be overwritten directly." )print ("\nFirst 5 lines of the output file:" )try :with open (flexinvert_input_obs_file_path, 'r' ) as f_check:for i in range (5 ):if not line:break print (line)except FileNotFoundError:print (f"Output file '{flexinvert_input_obs_file_path} ' not created." )
注意将输入路径替换成原先站点路径,输出路径替换成跟配置文件中path_obs一样的路径。
开始反演
通过./job_flexinvert开始反演