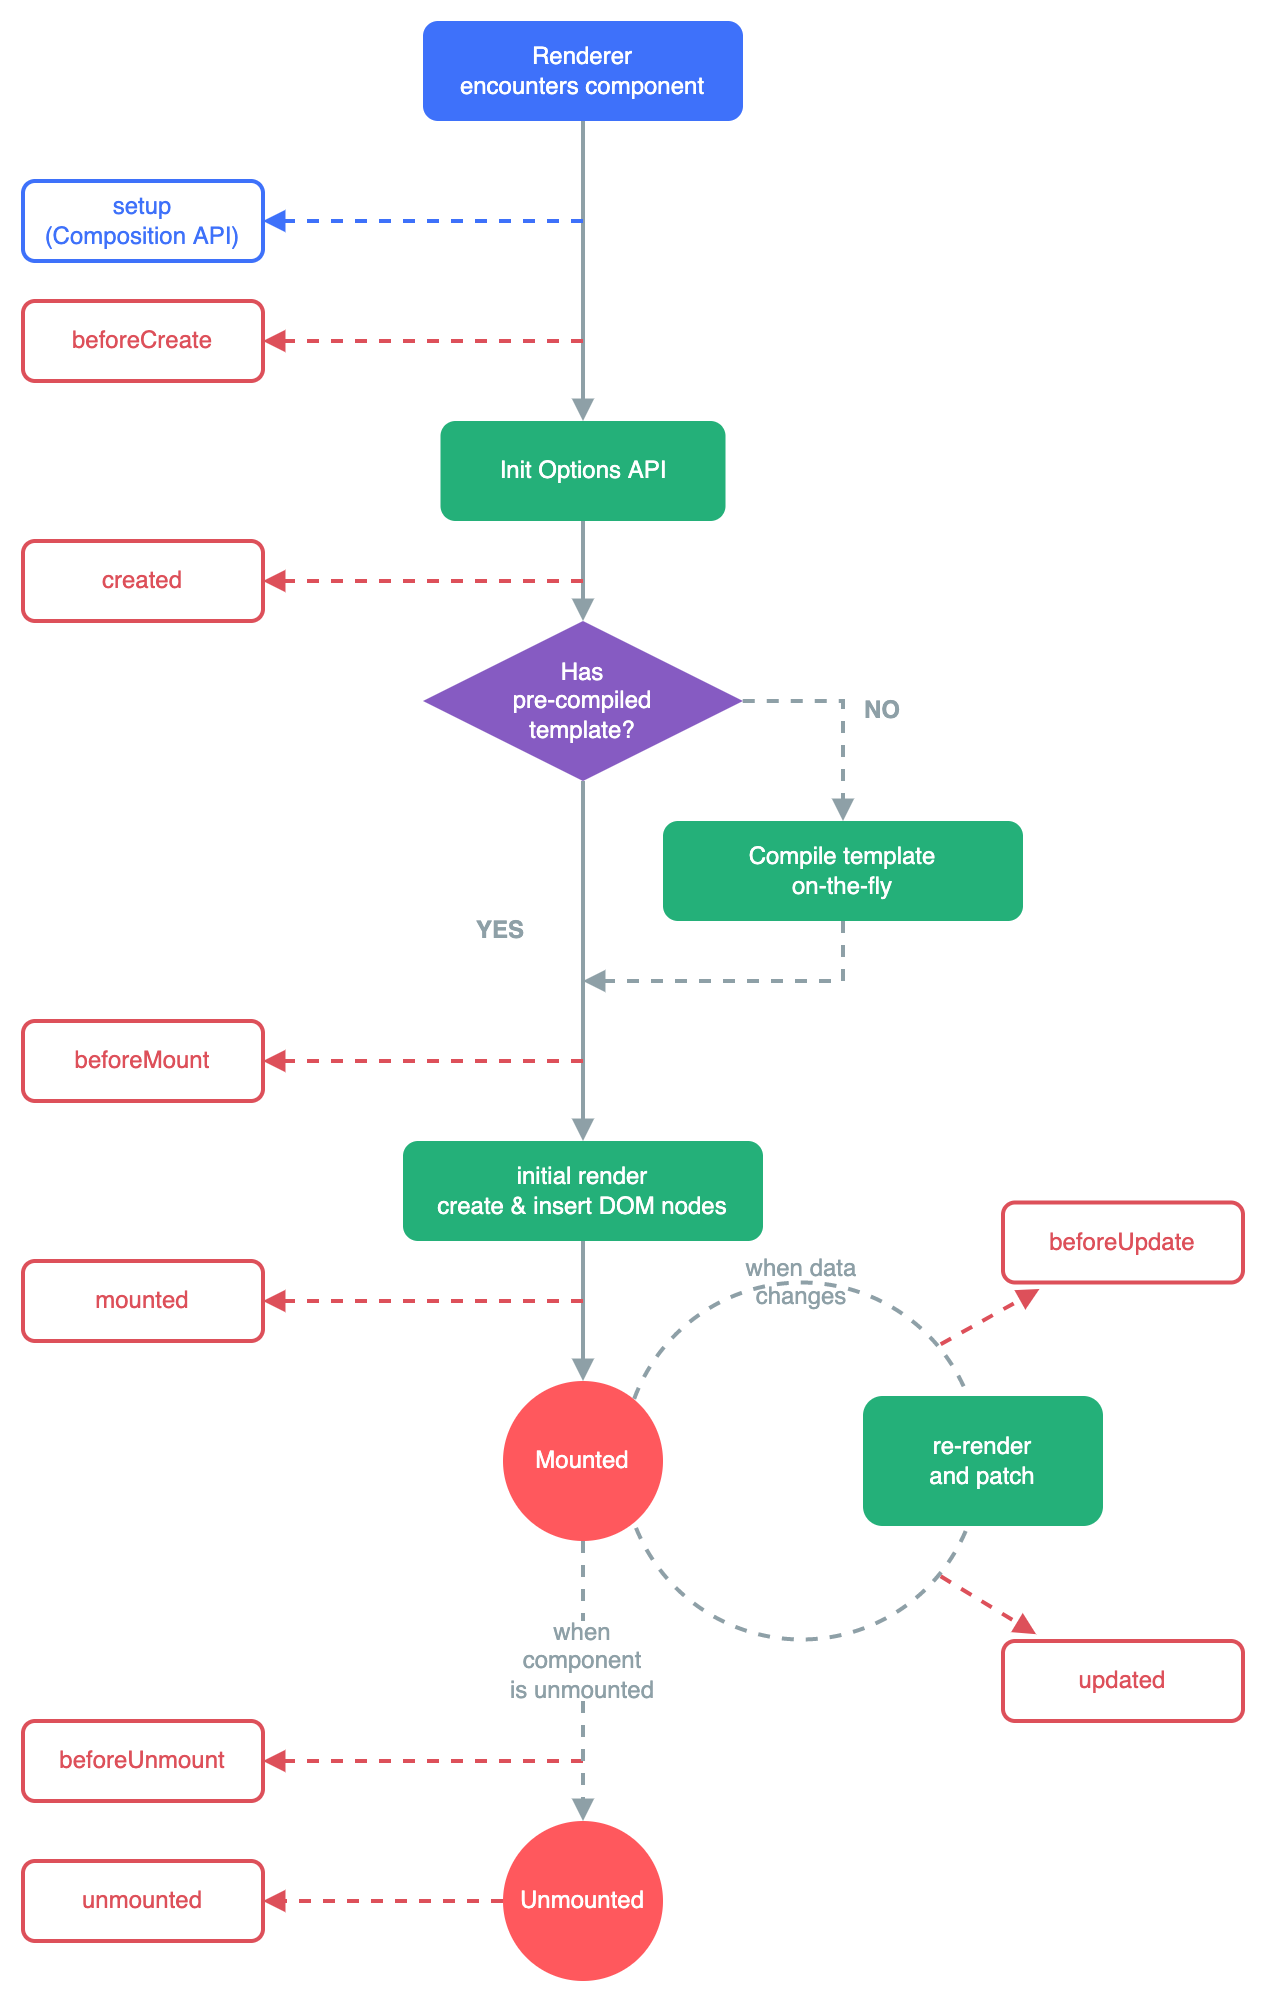
Vue的生命周期
Vue生命周期
通俗的讲就是:一个vue实例从创建到销毁的整个过程
①创建(响应式数据) ②挂载(渲染模板) ③更新(修改数据更新视图) ④销毁(关闭页面,销毁实例)
Vue生命周期函数
- 创建阶段(Creation):
- beforeCreate:实例刚被创建,数据观测和事件机制初始化之前被调用。
- created:实例已经创建完成,完成数据观测、属性和方法的运算,初始化事件等。
- 挂载阶段(Mounting):
- beforeMount:在挂载开始之前被调用:相关的 render 函数首次被调用。
- mounted:实例已经挂载到 DOM 上后被调用。
- 更新阶段(Updating):
- beforeUpdate:数据更新时调用,发生在虚拟 DOM 重新渲染和打补丁之前。
- updated:数据更新后调用,发生在虚拟 DOM 重新渲染和打补丁之后。
- 销毁阶段(Destroying):
- beforeDestroy:实例销毁之前调用。在这一步,实例仍然完全可用。
- destroyed:实例销毁后调用。在这一步,所有事件监听器被移除,所有子实例被销毁。
- 错误处理阶段(Error Handling):
- errorCaptured:当子组件抛出错误时会触发该钩子。
为了深入的理解这段话,我们要知道什么是实例
实例
在 Vue.js 中,”实例”(Instance)是指通过 Vue 构造函数创建的一个 Vue 实例对象。每个 Vue 应用都是通过创建一个 Vue 实例来实现的。当您使用 Vue 构造函数创建一个实例时,您可以传入一个选项对象,用于配置该实例的行为。
在 Vue 实例中,您可以定义数据、计算属性、方法、生命周期钩子函数等。这些属性和方法定义了该实例的行为和功能。Vue 实例还可以与 DOM 元素进行绑定,从而实现数据的双向绑定、事件处理等功能。
下面是一个简单的示例,演示了如何创建一个 Vue 实例:
1 | |
在上面的示例中,我们创建了一个 Vue 实例 vm,并传入了一个选项对象,其中包含了 el、data、methods 和 created 等属性。这个实例可以通过 vm 来访问,并且可以调用定义的方法、访问数据等。
Vue3 Composition API
进入到vue3后,组合式API大为推广,在这其中的生命钩子函数有了更灵活的运用,有了这样的变化:
onBeforeMount: 在组件挂载之前执行的函数,类似于 Vue 2.x 中的beforeMount钩子函数。onMounted: 在组件挂载到 DOM 后执行的函数,类似于 Vue 2.x 中的mounted钩子函数。onBeforeUpdate: 在组件更新之前执行的函数,类似于 Vue 2.x 中的beforeUpdate钩子函数。onUpdated: 在组件更新完成后执行的函数,类似于 Vue 2.x 中的updated钩子函数。onBeforeUnmount: 在组件卸载之前执行的函数,类似于 Vue 2.x 中的beforeUnmount钩子函数。onUnmounted: 在组件卸载后执行的函数,类似于 Vue 2.x 中的unmounted钩子函数。onActivated: 在组件被激活时执行的函数,用于配合<keep-alive>组件使用。onDeactivated: 在组件被停用时执行的函数,用于配合<keep-alive>组件使用。onErrorCaptured: 捕获子组件抛出的错误,类似于 Vue 2.x 中的errorCaptured钩子函数。
代码演示
我们分两组进行演示,分别是onBeforeMount和onMounted,onBeforeUpdate和onUpdated。其中用到比较多的就是Mounted这组。

onMounted
我们输入以下代码
1 | |
我们可以看到我们分别让两个生命周期函数打印出此时的值,可以看到注释里的结果,在onBeforeMount,也就是实例还挂载到DOM上,此时还没有开始渲染因此式undefined,在onMounted里,hello被打印了出来,说明此时已经完成了渲染,可以操作DOM了。因此我们平时都习惯将网页进入时就需要触发的函数放在onMounted里,防止函数无法准确获取到DOM元素。
onUpdated
1 | |
可以看到这里就是差异在内部数据更改和视图更新的区别,在onBeforeUpdate时数据并没有发生更新,而在onUpdated数据发生了更新并且可以显示出来。